HITBAMS 2019 OTP, OTP2, and OTP3 Writeup
Tags: ctf - web - crypto
In this write-up we show our solutions for solving the OTP challenges during the HITB2019AMS CTF.
All three original challenges can be downloaded using the following links if you want to play for yourself: OTP, OTP2 and OTP3. The challenges can all be run on your own computer if you have ruby installed. Before running the servers you do need to create the flag.txt and secret.txt files. Without these the servers will not run, as the contents of the files are read upon start up.
OTP
The first challenge provided us with just an address and a port. In the examples of this write-up, the first challenge is hosted on localhost at port 32173.
To find out what the server is actually doing or expecting, we connect to it with netcat and play around. The following is shown when a connection is established:

The ruby source code of the server is displayed if no or invalid input is entered, followed by an immediate connection termination. In order to pass the initial proof-of-work in the example of the screenshot, we need to find a currently unknown value ending with d2e5784ceb366bbc6de5c40c123f that results in the value af5cf2473f8d8448ebfcd12cda9149852e6feb0aafdbf8f1a3661cdca63af900 when the SHA256 hash is calculated over the former value. The first four characters are masked using a “?”, so we do know the exact total length of the input. Looking at the remaining part we know what characters are expected in the input (hex characters, one of: 0123456789abcdef).
The correct value can be found using an offline brute-force approach as we are dealing with (one-way) hashes. In the worst case, this will only cost us 16 * 16 * 16 * 16 = 65536 SHA256 calculations, which can be done pretty fast on normal hardware. The following python function can be used to find out that e60cd2e5784ceb366bbc6de5c40c123f is the actual correct value:
import hashlib

def solve_proof_of_work(part, compare):
    a = "0123456789abcdef"  #hex
    for i in a:
        for j in a:
            for k in a:
                for l in a:
                    c = '%s%s%s%s' % (i,j,k,l) + part
                    if hashlib.sha256(c).hexdigest() == compare:
                        return c
When the correct value is entered, the second half of the challenge begins. A menu is shown in which a token can be generated or validated. By generating a token we can see what a token looks like:

We once again get disconnected immediately after the generated token is displayed and the whole process starts anew when reconnecting to the server, with a new unknown value for the proof-of-work. At some point we need to automate this process to at least pass the initial check if multiple connections are needed.
Analyzing the source code of the server we can get a closer look of the inner workings of the server. The important parts are:
@max = 100_000_000
A maximum number of one hundred million is defined. It is used for generating tokens, but we will see later on how it is being used.
@seed = SecureRandom.random_number @max
A seed is generated the first time the server is started. SecureRandom is used for this purpose and will generate a fairly random number. We will see later on how this seed is used and updated.
@flag = IO.read('flag.txt').chomp
The flag is in a file called flag.txt and read into the variable @flag during the startup of the server.
def client_handler(client)
  # Call for PoW
  proof_of_work client

  # Show menu
  client_menu client

  client&.close
end
The main execution handler for each connected client. Do the proof-of-work, show the main menu and finally disconnect.
def proof_of_work(client)
  value = SecureRandom.hex(16)
  work  = Digest::SHA2.hexdigest value
  client.puts "Please provide proof of work for: SHA2(????#{value[4..-1]}) == #{work}"
  client.print '? '
  pow = Digest::SHA2.hexdigest client.gets.chomp
  return true if pow == work

  # Show source as implementation reference if PoW fails
  client.puts File.read __FILE__
  client&.close
end
The abovementioned and already solved proof-of-work check. It uses SecureRandom to generate a value for the check. Show the source code of the server if an invalid value is given.
def next_token(token = '')
  @mutex.synchronize do
    token = Digest::SHA2.hexdigest @seed.to_s
    if @seed < @max
      @seed += 1
    else
      @seed = 0
    end
  end
  token[0..16]
end
The core of the token generation and the part we need to examine in more detail. Both the generate and validate functions are calling this function to display or check the current token. The function retrieves the value of the ealiermentioned seed (which is initially a random number), a SHA256 hash is calculated over this value, of which the first 17 characters are used as the current token. The value of seed is set to zero if the max is reached, or increased with one if not.
def show_token(client)
  client.puts next_token
  client&.close
end
The show_token function simply displays the token based on the current seed.
def validate_token(client)
  client.puts 'Please provide your OTP token'
  client.print '? '
  if client.gets.chomp == next_token
    client.puts @flag
  else
    client.puts 'Invalid token'
  end
  client&.close
end
This function gets the token based on the current seed, gets the input of the user and compares these. The flag is shown if they are equal, if not good luck next time.
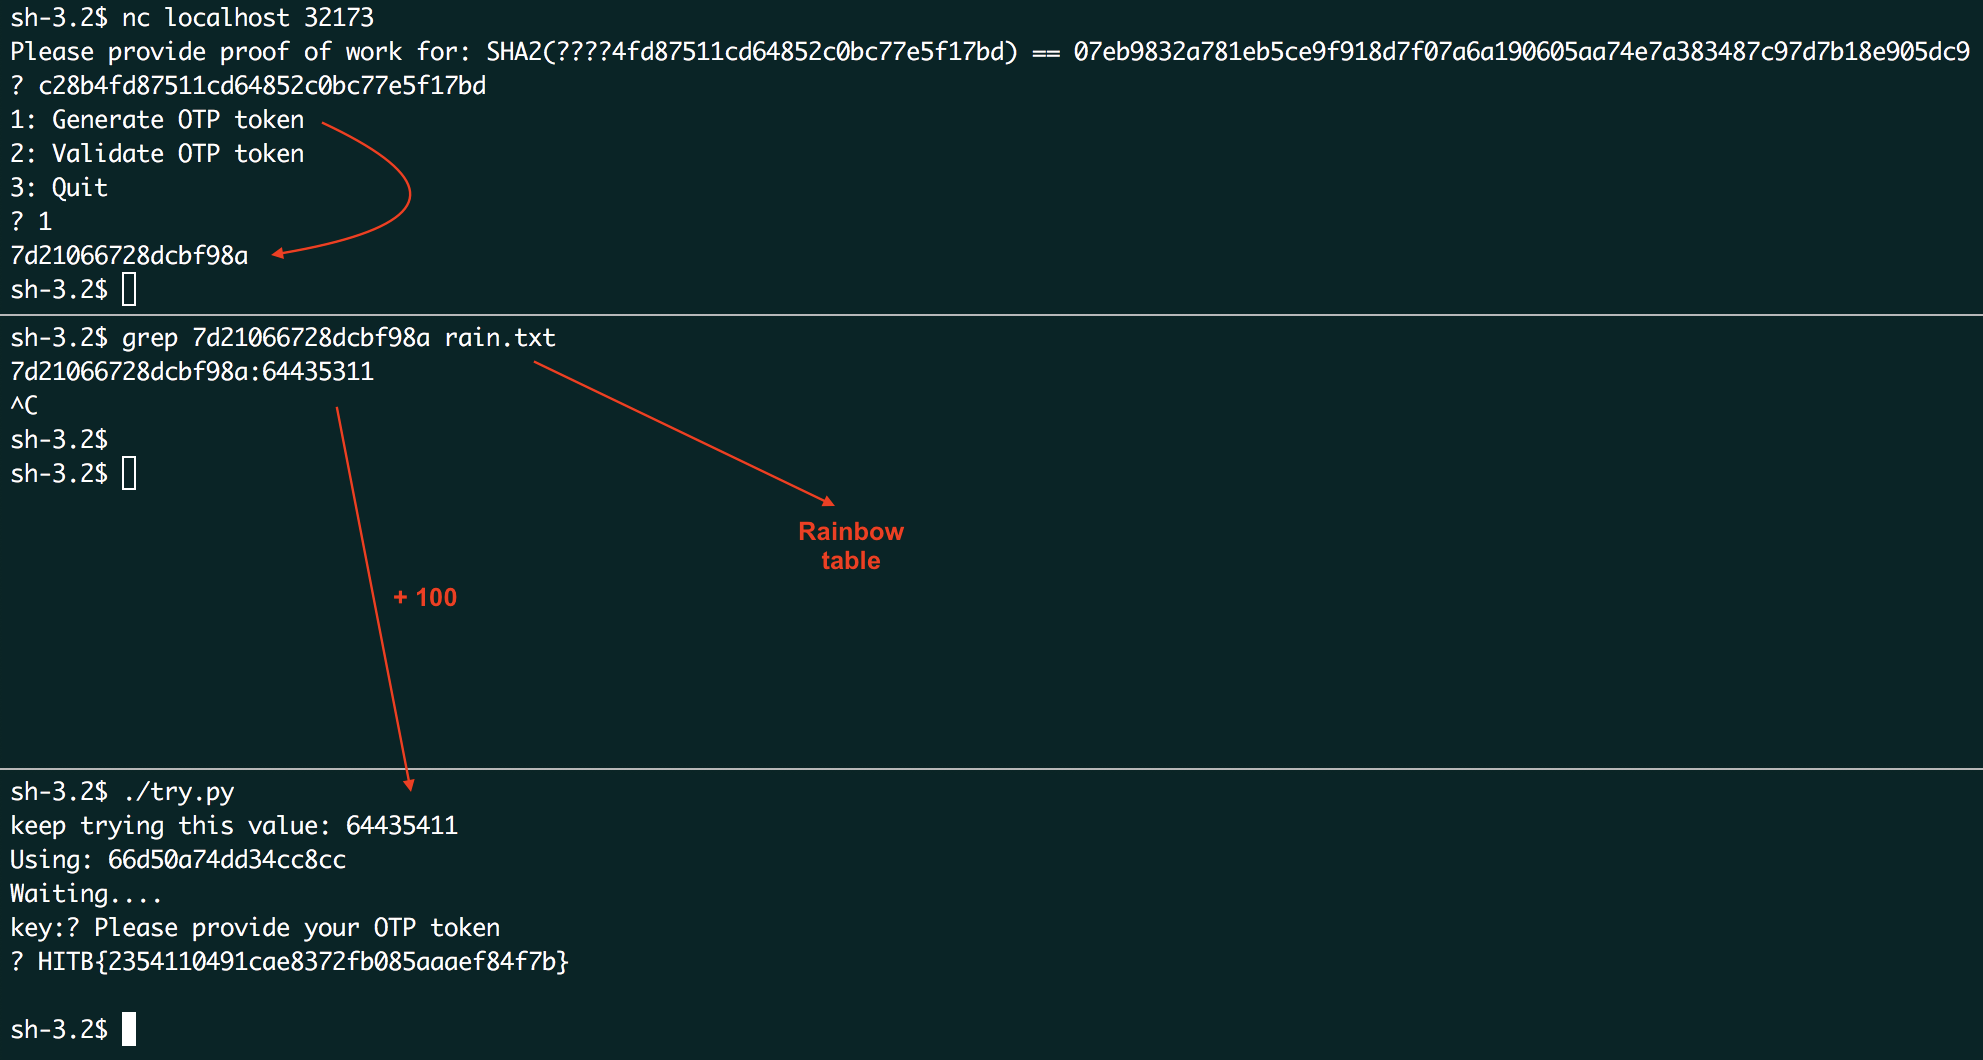
Our first approach was to wait for the max to be reached, by continuously spamming the server with the first 17 characters of the SHA256 hash of 0 (5feceb66ffc86f38d). As there are other CTF teams participating, this value will be reached more easily, but the request that validates with the seed value 0 can be missed if another team is doing the request. We needed a better and faster approach.
If we can approximately calculate or predict the current seed, we can pick a number that is a few hundred larger than this seed value and continuously use (read: spam) the hash of this value on the server. This shortens the window and increases the chance that we will hit the correct seed value. After much thought, we concluded that the show_token and the validate_token uses the same function, so we can actually use the current generated token to find an approximate of the current seed. To find that seed, we need to find a value N so that FirstSeventeenCharsOf(SHA256(N)) == GENERATED_TOKEN. N is a numeric value between 0 and 100,000,000 (the max). We could write a function that loops from 0 to 100,000,000 and find the generated token, but this will take a relative long time to find the value N. By the time the generated token is found, the seed might already be increased by a lot. We needed a quicker way (again).
We decided to use the concept of rainbow tables. A rainbow table is a precalculated lookup table stored on the disk in which the original value can be found of a hash value. Rainbow tables can be found online, but none that adheres to the special requirements (the first 17 characters of the hash and numeric only) that can be used to solve this challenge quickly. If we would generate our own rainbow table, how much disk space will that take? It turns out not that much. If assumed that each entry needs 29 bytes (17 characters for the hash, 10 characters for the original value and 2 for separators), 100.000.000 hashes will approximately take 2.5gb of disk space. A simple python script to generate this rainbow table and takes about 15 minutes to generate (remember to pipe this into a text file):
#!/usr/bin/env python
import hashlib

for i in range(1, 100000000):
    print "%s:%s" % (hashlib.sha256(str(i)).hexdigest()[0:17],i)
With the rainbow table generated, an approximate of the current seed can be looked up by grepping the generated token in the text file. This will take around 5~15 seconds for a single lookup. As the last step in solving this challenge we need to pick a single value larger than the found seed (like about two hundred) and constantly use the hash of this value against the server. We needed automate this and wrote the following script to do it. The telnetlib python module is used to connect to the server. Note that this script also solves the proof-of-work check automatically:
#!/usr/bin/env python
import hashlib
import telnetlib
import re

def solve_proof_of_work(part, compare):
    a = "0123456789abcdef"
    for i in a:
        for j in a:
            for k in a:
                for l in a:
                    c = '%s%s%s%s' % (i,j,k,l) + part
                    if hashlib.sha256(c).hexdigest() == compare:
                        return c


def try_hash(hash_to_try):
    # connect to the server
    t = telnetlib.Telnet("localhost", 32173)

    # read the proof of work string
    powork = t.read_until('\n')

    # parsing the proof of work string
    s = re.search('\?\?\?\?(.*)\)', powork).group(1)
    r = re.search('== (.*)\n', powork).group(1)

    # solve it
    po = solve_proof_of_work(s, r)

    # send the proof of work to the server
    t.write(po + "\n")

    # read the main menu
    t.read_until('\n')
    t.read_until('\n')
    t.read_until('\n')

    # select menu 2
    t.write('2\n')

    # send the hash
    t.write(hash_to_try+'\n')
    result = t.read_all()
    return result

def main():
    keep_try_this = "%s" % input("keep trying this value: ")
    hash_to_try = hashlib.sha256(keep_try_this).hexdigest()[0:17]
    print "Using: " + hash_to_try
    print "Waiting...."

    while True:
        result = try_hash(hash_to_try)

        if "Invalid token" not in result:
            print "key:" + result
            return

if __name__ == "__main__":
        main()
The solution in action:
OTP 2
The second OTP challenge is similar to the first one, with some changes implemented in the server code. The same proof-of-work check is still required, but since this part was not changed we can still use the proof-of-work solver of the previous challenge. For this write-up the server is hosted on localhost at port 32174.
The main changes to the code are:
- The max has been increased to 100,000,000,000,000,000 (100 quadrillion). This makes our approach of the first challenge (a rainbow table) not viable anymore.
- An unknown secret key is additionally prepended to the seed value. This value is read from an external text file and is not exposed in the source code.
- The resulting hash now consists of 16 characters instead of the previously 17.
- The seed is only increased after the main execution process of a client is completely finished.
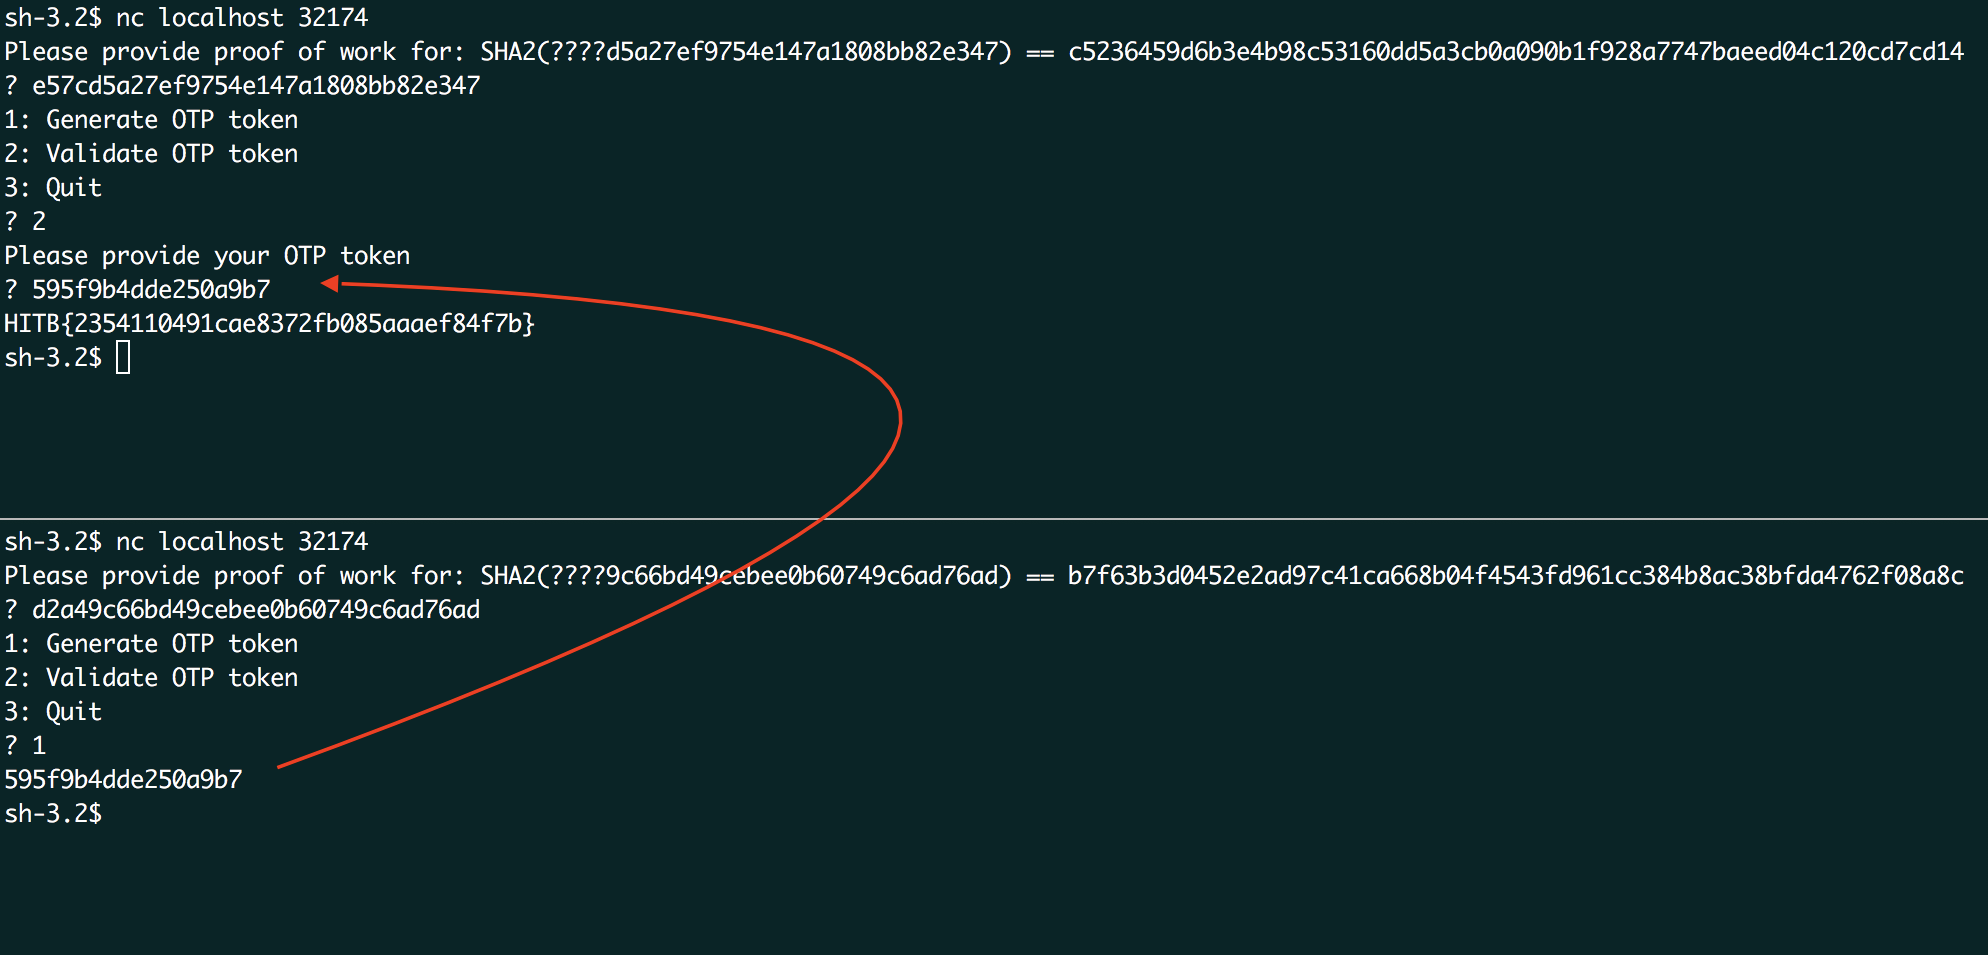
This time, even if we could predict the seed, we could still not calculate the token offline. The prepended secret key prevents this, unless it is an empty string (we were pretty sure this was not the case). So meddling with the seed was not an option for this challenge, we had to find a different flaw. This flaw happens to be in the last line of the abovementioned list of changes. The seed is only incremented when an execution process of a client is completely finished. So if a new session is opened while the other is still in session, both sessions should be using the same seed and thus have the same hash. The displayed token of the first session can therefore be used in the second session, showing us the flag. A step-by-step:
- netcat to the server (session 1)
- netcat to the server in a different terminal (session 2)
- solve the proof-of-work of both sessions (using approach of OTP 1)
- in session 1, select the menu item to validate the token
- in session 2, select the menu item to generate a token
- enter the token generated of session 2 in session 1
Screenshot in action:
OTP 3
The third installment of the OTP challenge has yet another set of code changes. For this write-up, the server is running on localhost at port 32175. The proof-of-work check is still the same as the previous ones. The generated token in the second part however now consists of a salt, algorithm string and a hash-based message authentication code (HMAC). These values are separated with a colon and the whole is base64 encoded. The HMAC is generated over a string concatenation of a salt, the seed, the algorithm and a timestamp separated with a colon and using 6 character randomized hex string as a secret key. This can also be seen in the following code snippet:
def next_token(seed = @seed.to_s, salt = SecureRandom.random_bytes(4), algo = 'SHA256', token = '')
  @mutex.synchronize do
    salt      = Base64.strict_encode64 salt
    timestamp = (Time.now.to_i / 100) * 100
    hmac      = OpenSSL::HMAC.hexdigest(algo, @key, "#{salt}:#{seed}:#{algo}:#{timestamp}")
    token     = "#{salt}:#{algo}:#{hmac}"
    increment
  end
  Base64.strict_encode64 token
end
All values except the seed and the key can be guessed or are returned by the server (embedded in the token). This function therefore seems hard to break due to these unknown values. We needed to look for other weak spots.
Both show_token and validate_token still use next_token to display and check the token against the input of the user. The validate_token function however, seems to be faulty:
def validate_token(client)
  client.puts 'Please provide your OTP token'
  client.print '? '

  input = client.gets.chomp
  begin
    input    = Base64.decode64(input)
    input    = input.split(':')
    input[1] = Base64.decode64(input[1])
  rescue StandardError => _e
    client.puts 'Failed to decode input'
    return
  end

  if input[0].to_i < @seed - 1
    client.puts 'Token replay attack detected!'
    client&.close
    return
  end

  hmac = Base64.decode64(next_token((@seed - 1).to_s, input[1], input[2])).split(':').last

  if input[3] == hmac
    client.puts @flag
  else
    client.puts 'Invalid token'
  end
  client&.close
end
Parts of the function that are fishy are:
- The user input is expected to consist of four parts, while the base64 decoded generated token only has 3 parts.
- The value of the first part (index 0) of the user input is only used once. The server will send back an error if the value is lower than the previous seed. We can by-pass this check by just supplying a value that is close to the max value, like for example: 99999999999999997.
- The seed that is used to calculate the HMAC-check value is done over the previous seed (seed - 1). So if we have the HMAC of the previous seed, we do not need to predict or calculate the seed in order to view the flag. And so it happens, we can view the HMAC of a previous seed by running 2 sessions back-to-back.
As a conclusion of the code review, a valid token for the second session looks like this:
base64(99999999999999997:<PREVIOUS SALT>:SHA256:<PREVIOUS HMAC>)
The back-to-back sessions do have to run in quick succession (within a minute) due to timestamp used in the HMAC calculation. The following python script has been created to help us generate the previous token and send a valid token to the server. Running the script against the server will immediately return the correct flag.
#!/usr/bin/env python
import base64
import hashlib
import telnetlib
import re

def solve_proof_of_work(part, compare):
    a = "0123456789abcdef"
    for i in a:
        for j in a:
            for k in a:
                for l in a:
                    c = '%s%s%s%s' % (i,j,k,l) + part
                    if hashlib.sha256(c).hexdigest() == compare:
                        return c

def get_client_until_menu():
    # connect to the server
    t = telnetlib.Telnet("localhost", 32175)

    # read the proof of work string
    powork = t.read_until('\n')

    # parsing the proof of work string
    s = re.search('\?\?\?\?(.*)\)', powork).group(1)
    r = re.search('== (.*)\n', powork).group(1)

    # solve it pretty please
    po = solve_proof_of_work(s, r)

    # send the proof of work to the server
    t.write(po + "\n")

    # read the main menu
    t.read_until('\n')
    t.read_until('\n')
    t.read_until('\n')

    return t

def generate_valid_token(prev_token):
	token_parts = prev_token.decode("base64").split(":")
	return base64.b64encode("99999999999999997:%s:%s:%s" % (token_parts[0], token_parts[1], token_parts[2]))

def get_token():
	t = get_client_until_menu()

	# select menu 1
	t.write('1\n')
	return t.read_all().split(' ')[1].strip()

def send_token(new_token):
    t = get_client_until_menu()

    # menu 2 we select you!
    t.write('2\n')

    t.write(new_token+'\n')
    result = t.read_all()
    return result

def main():
    previous_token = get_token()
    new_token = generate_valid_token(previous_token)
    print send_token(new_token)

if __name__ == "__main__":
    main()
The script in action:

The challenge can also be solved manually, but you have to perform all actions quickly within a minute (which is what we did during the CTF). However, instead of decoding, prepending and re-encoding, you can also just prepend the previous token with the base64 value of 99999999999999997: (which is OTk5OTk5OTk5OTk5OTk5OTc6) due to the nature of base64 encoding.